Introduction
Do your professors put you to sleep in class whenever they start talking about crystallization or recrystallization (you can’t even remember the difference!)? Well, you’re in the right place! All your doubts about crystallization and recrystallization will be cleared up thanks to this article! Through simple language, images, diagrams, and videos, you’ll master this topic and erase the consequences of that physiological nap that seems to hit you every time your professor opens their mouth.
But now, let’s get started!
Clarifying the Terms
Let’s start by clarifying a few terms. Here are a couple of definitions:
Def.
Crystallization= the process by which a substance changes into a crystalline state;
Recrystalization= a technique used to purify a solid substance from small amounts of impurities.
So, crystallization is a term that refers to a physical phenomenon, whereas recrystallization is a purification technique used in Chemistry laboratories. However, the two terms are often confused with each other and not only by students!
In this article, we will mainly focus on recrystallization, as you may have guessed from the title!
Download our files

Download this article+Bonus content
Would you like to read the full article offline, including additional insights? Download the file for a complete overview of the phenomenon (theory + practice).
Go to the course
Do you need step-by-step video tutorials on recrystallization and Organic Chemistry Laboratory? ENROLL in the complete course.
Recrystallization: What It Is and When to Use It
Recrystallization allows a solid to be purified through two fundamental steps:
Heating the solid until it dissolves in a suitable solvent;
Subsequent slow cooling of the resulting solution to allow pure crystals to form.
This technique should only be used when the sample to be purified contains 10–20% impurities. For more heavily contaminated samples, it is better to use other purification techniques, such as column chromatography.
The Stages of Recrystallization
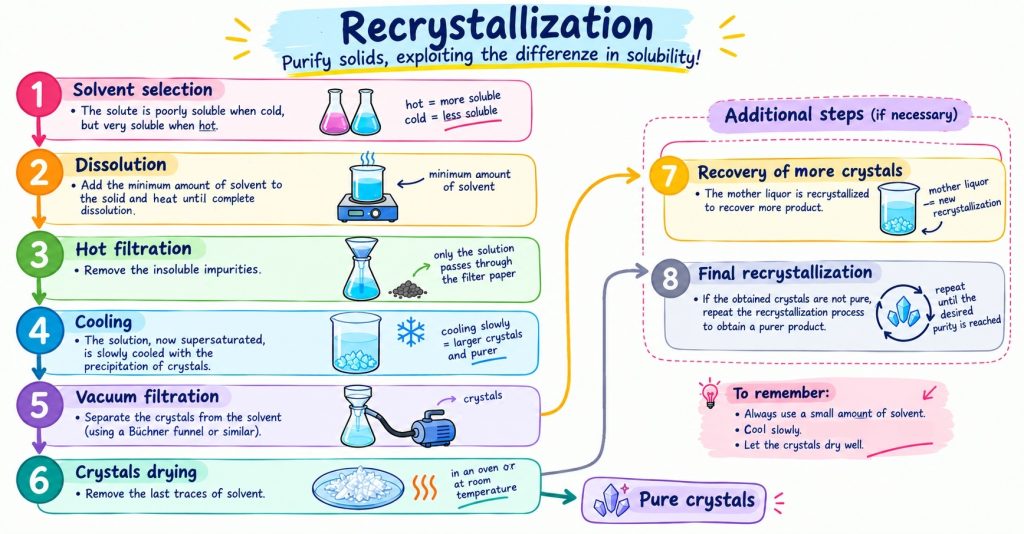
There are mainly six steps involved in carrying out a recrystallization:
1- Solvent selection;
2- Dissolution of the sample in the minimum amount of solvent at a temperature close to or at the boiling point;
3- Filtration of the hot solution to remove insoluble impurities and particles;
4- Slow cooling of the filtered solution;
5- Vacuum filtration of the crystals;
6- Drying of the crystals.
Let’s take a closer look at each of these steps.
Step 1: Selection of the solvent
Solvent properties
The right solvent for recrystallization must meet one fundamental requirement:
1. It must dissolve the sample when hot but leave it insoluble when cold.
Ideally, the solvent should also:
2. Not react with the sample;
3. Allow the impurities to be removed, by making them either soluble at all temperatures or insoluble at all temperatures;
4. Have a reasonably low boiling point, so that it can be easily removed.
Point 3 is essential for achieving good purification. If the impurities have a different solubility from the sample, they can be easily removed by filtration. For example, insoluble impurities can be removed by hot filtration (step 3). Soluble impurities, on the other hand, are easily removed during the penultimate step of the recrystallization process: once the sample has crystallized, the crystals can be separated from the mother liquor, which contains the impurities, by filtration.
How to Choose the Solvent
Now that we have clarified the properties of the solvent, let’s see how to select one in the laboratory.
If the sample is a known compound, the easiest approach is to conduct a literature search to see how it was recrystallized in previous experiments and identify the solvent that was used.
If, on the other hand, the sample is a new compound or no recrystallization procedures are reported in the literature, you will need to carry out preliminary experiments to determine the most suitable solvent.
If you are in the latter situation, following the famous rule “like dissolves like,” start by testing a solvent with functional groups similar to those of your sample. For example, if your sample is a highly polar compound, such as a carboxylic acid, choose a polar solvent such as methanol or water. If, on the other hand, you have a hydrocarbon, choose a nonpolar solvent such as hexane or petroleum ether. Then proceed as follows (see also Fig. 1):
1. Place a small amount of your crude product (e.g., 100 mg) in a minimal amount of the selected solvent (e.g., 1 mL) — the sample should not dissolve;
2. Heat to boiling — the sample should dissolve;
3. Cool slowly — crystals should form.
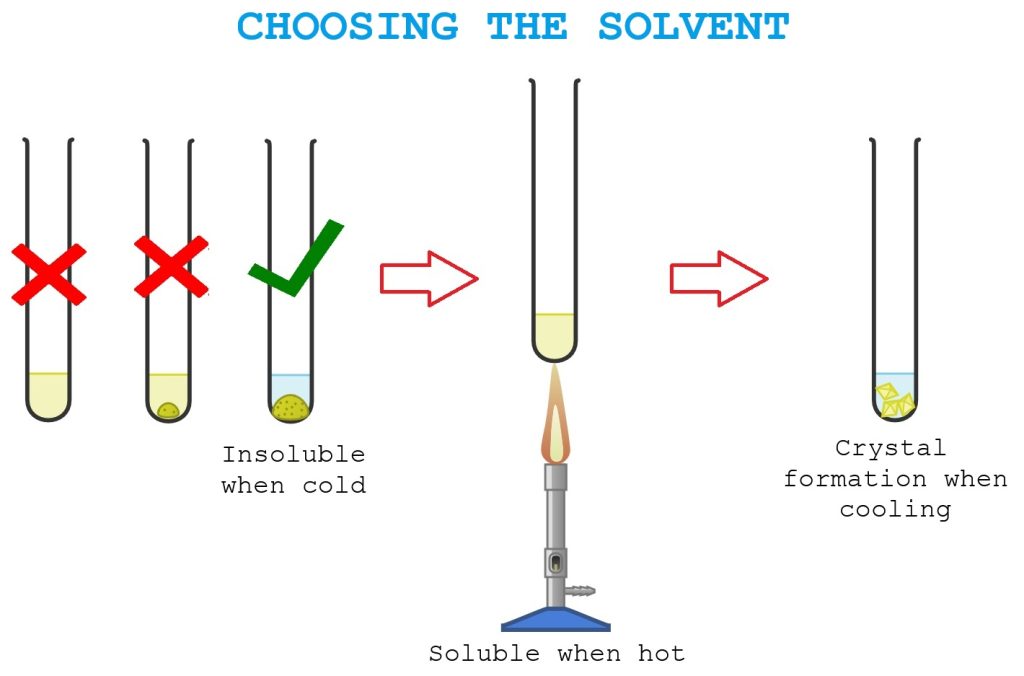
If all the conditions described above are met, the selected solvent is suitable, and you can proceed with the recrystallization of the entire sample. Otherwise, you will need to choose another solvent and repeat steps 1–3.
Practical tip → As an alternative solvent, it is often a good idea to choose the next higher homologue of the solvent you have tested before switching to a completely different solvent. For example, if methanol has been tested, ethanol can be chosen for the next trial. This is because the higher homologue has a higher boiling point (ethanol 78 °C vs. methanol 65 °C), so it can be heated to a higher temperature and, consequently, the solubility should increase.
Typical solvents
The table below lists the common solvents used for recrystallization.
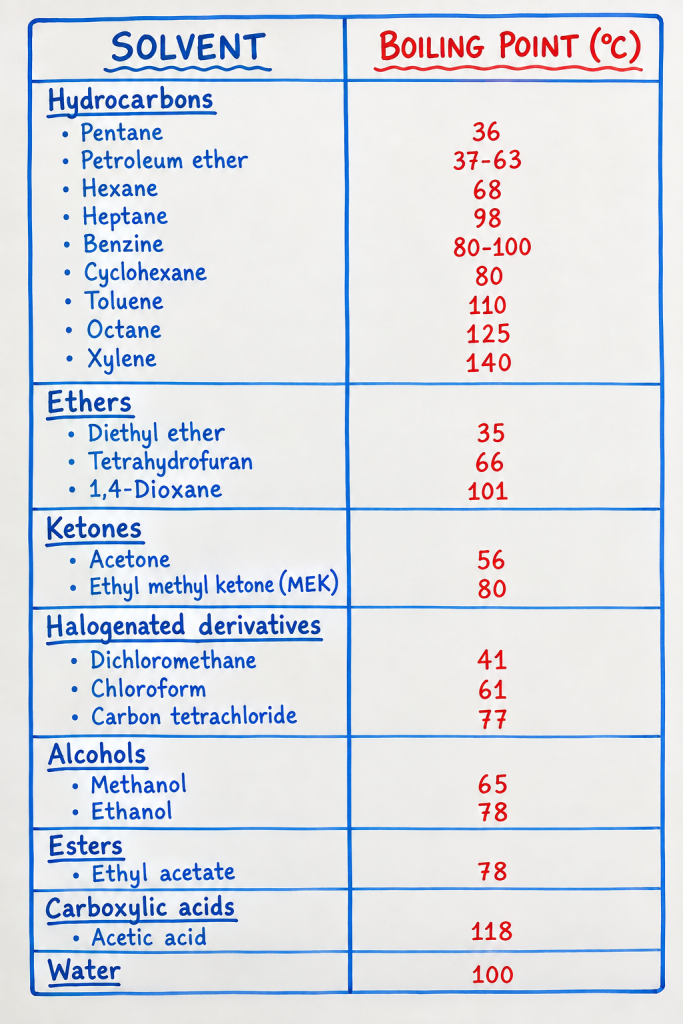
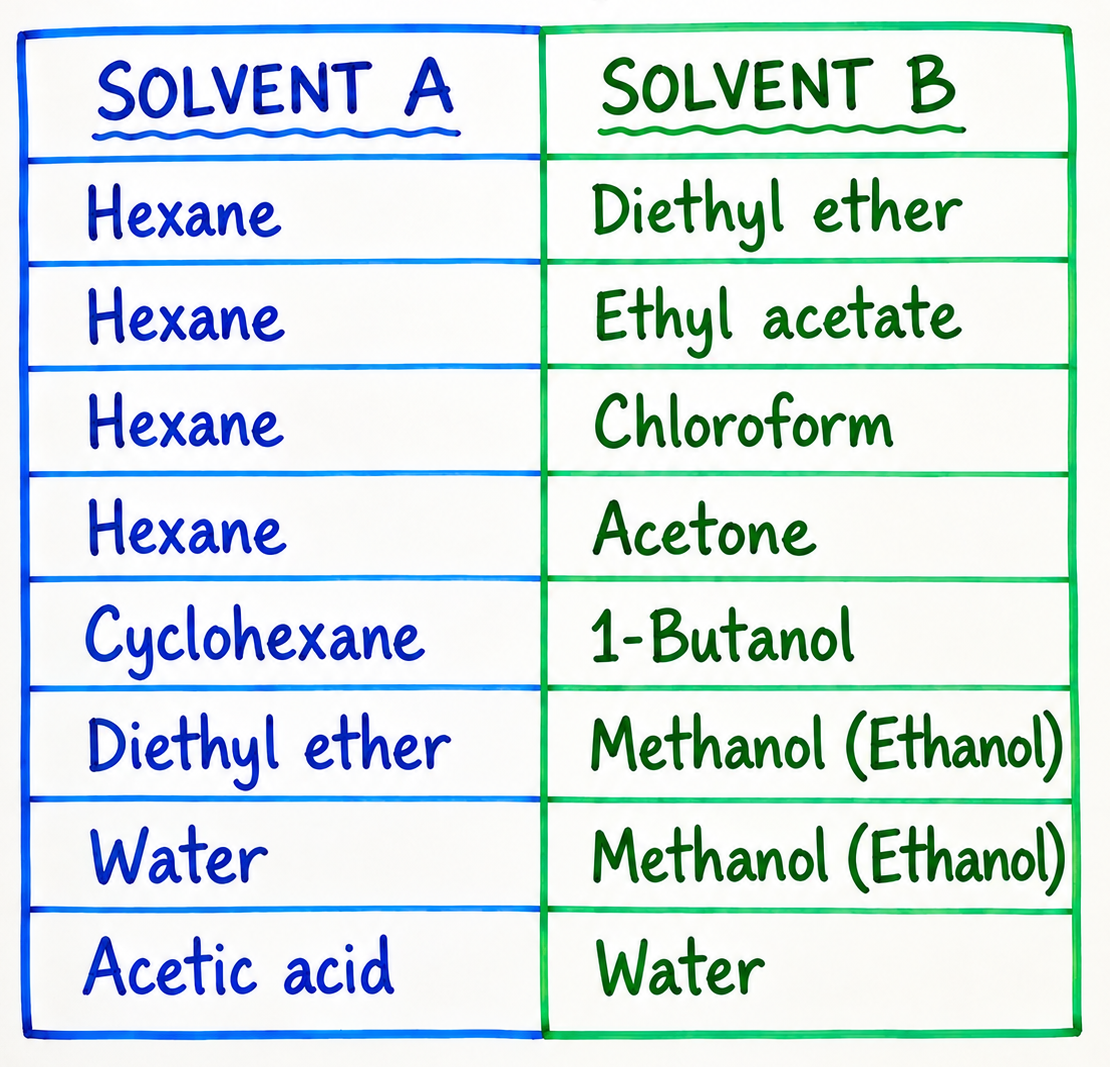
If you cannot find a suitable solvent, you can also try a mixture of solvents (which must be miscible with each other!). The table below lists some common solvent mixtures.
Step 2: Heating
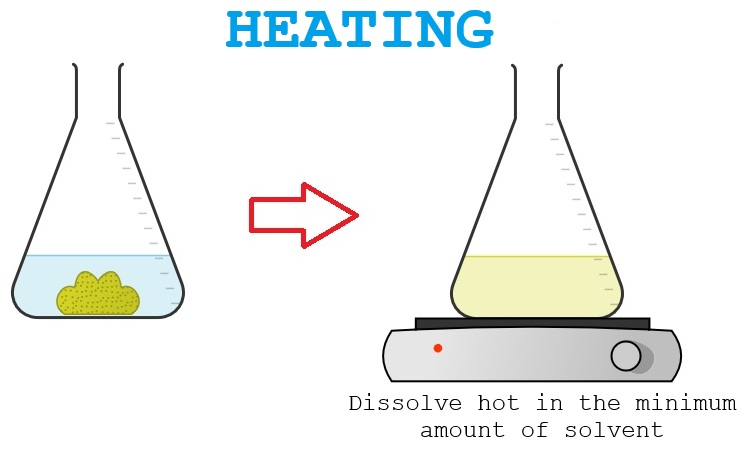
During the heating phase, the compound is dissolved in the minimum amount of hot solvent. The operation is generally carried out using Erlenmeyer flasks, which also act as partial condensers for the solvent vapors (Fig. 2).
It is advisable to heat the solvent in a separate Erlenmeyer flask, bringing it close to or to its boiling point, and then add part of this solvent to another Erlenmeyer flask containing the compound to be crystallized and kept heated. The solvent should be added carefully, using the minimum amount necessary to dissolve the sample.
Another approach is to add a small amount of cold solvent directly to the Erlenmeyer flask containing the sample. The flask is then heated and, if the sample does not dissolve, additional solvent is slowly added until complete dissolution is achieved while hot. This latter approach is more prone to errors, especially if more cold solvent than necessary is added at the beginning.
If the solvent used is toxic, it is advisable to attach a condenser to the Erlenmeyer flask.
For heating, it is advisable to use a hot plate, avoiding the use of open flames.
Safety note → Do not forget to add boiling chips or a stir bar to the flask containing the sample BEFORE heating. This prevents the formation of a superheated liquid that could subsequently boil violently. If you use a stir bar, keep the solution stirring throughout the heating process. Remember to remove the boiling chips or stir bar with tweezers as soon as the heating phase is complete.
Step 3: Filtration fo the insoluble impurities
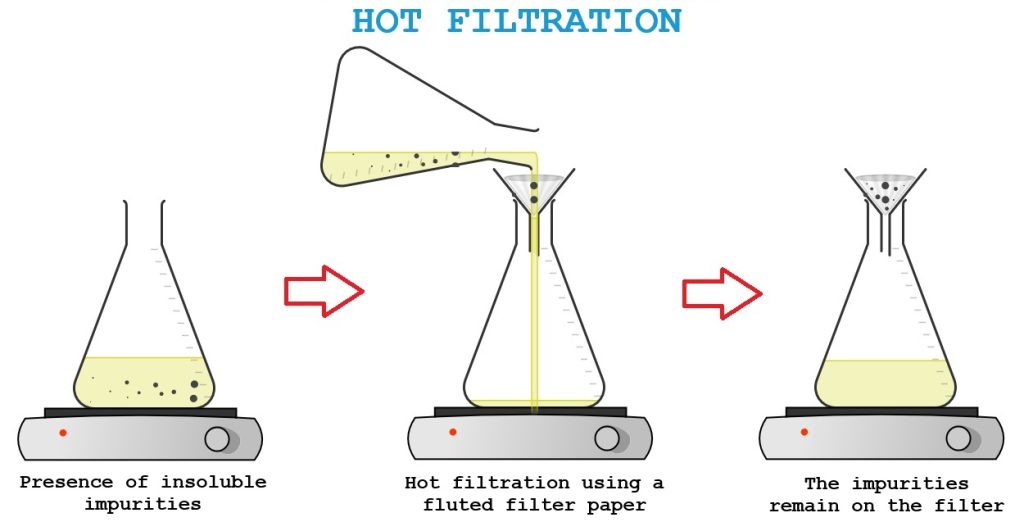
If the sample contains impurities that are insoluble when hot, they must be removed by filtration (Fig. 3).
The filtration should be carried out quickly and while hot, so it is advisable to warm both the filtration flask and the funnel. A fluted filter paper can be used to collect the impurities during filtration.
If there are no insoluble impurities, this step can be skipped.
Step 4: Cooling
The Erlenmeyer flask containing the solution to be crystallized should be covered with a stopper (or with a watch glass placed on top) and allowed to cool as slowly as possible to promote crystal formation and, consequently, the removal of impurities from the resulting solid.
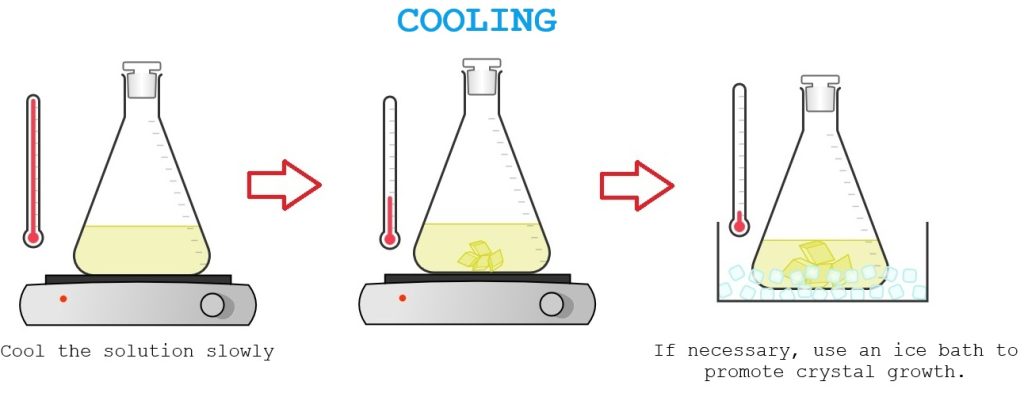
At the end of the crystallization process, the solution can also be cooled to a temperature below room temperature to promote further crystal growth. For example, an ice-water bath can be used to lower the temperature to 0 °C.
Step 5: Crystal filtration
The crystals obtained must be separated from the mother liquor by vacuum filtration (Fig. 5). This filtration allows the crystals to be recovered quickly by the action of the vacuum..
The filtration should be carried out by decantation, first transferring the mother liquor to the filtration funnel and then the crystals. The crystals remaining on the funnel should be washed with small portions of cold solvent.
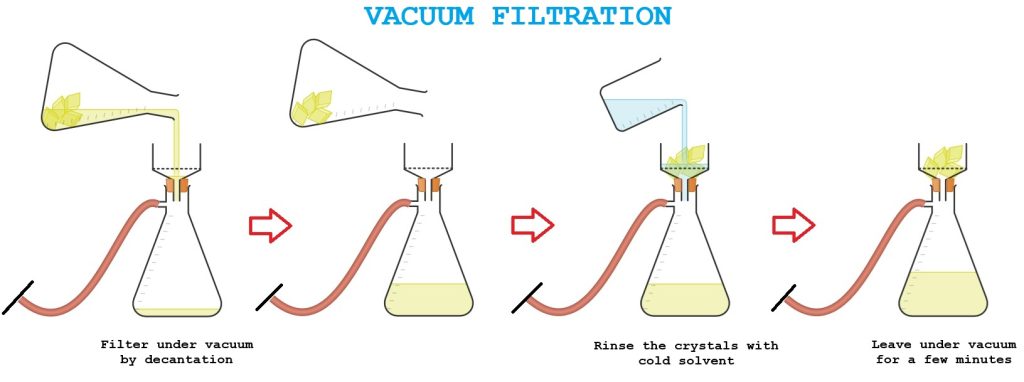
The suction provided by the vacuum pump can also be used to partially dry the crystals on the funnel: simply leave them on the funnel for a few minutes with the vacuum pump running.
Step 6: Drying of crystals
Although some drying can be carried out during the vacuum filtration step, solvent residues will still remain in the crystals. The sample must therefore be dried completely.
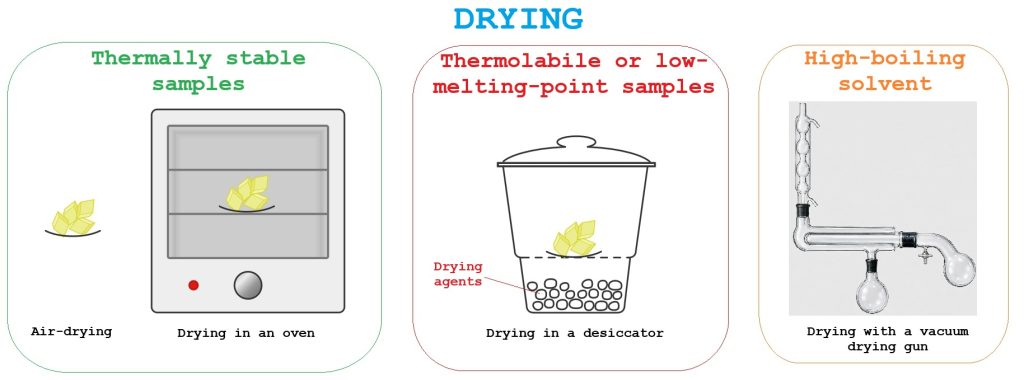
The appropriate method depends on the thermal stability of the sample and the type of solvent used (see also Fig. 6):
– If the sample is thermally stable and the solvent is not toxic, the sample can be air-dried for several hours or dried in an oven at a temperature at least 20 °C below the melting point of the crystals.
– If the sample has a low melting point or is thermolabile, it can be dried by placing it in a desiccator for 12–24 h, in the presence of an appropriate drying agent (P₂O₅, silica gel, or CaCl₂ to remove water; alcohols or paraffin to remove hydrocarbons and halogenated solvents). Vacuum can also be applied to accelerate drying if a vacuum desiccator is available.
– If the solvent has a high boiling point drying can be carried out under vacuum and at a temperature above room temperature. Vacuum drying guns can be used for this purpose.
Additional steps
If you wish to recover more of the sample, the mother liquor filtered off during step 5 can be recrystallized (see Fig. 7). The mother liquor will certainly contain some of the dissolved sample along with the impurities. To recover it, the solvent must first be removed by evaporation under reduced pressure, and the resulting solid can then be recrystallized by repeating steps 2–6. The crystals obtained will most likely be much less pure than those obtained from the first recrystallization, because the mother liquor is depleted in the sample but enriched in impurities. Therefore, the subsequent recrystallization will inevitably be less efficient.
Moreover, if the sample obtained from the first recrystallization is found to be insufficiently pure, its recrystallization can be repeated (steps 2–6) (Fig.7) to gain a purer product the second time. Obviously, this will result in a further loss of sample and therefore a lower overall crystallization yield.
The image below summarizes all the recrystallization steps, including both the basic and additional steps.